|
|
Overview
Architecture
Hardware
Software
Demo at ICDE Conference
Download
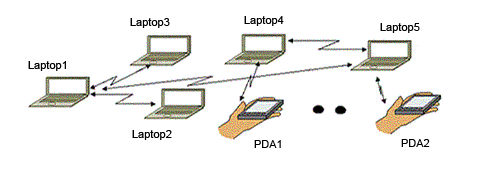
The prototype consists of laptops which act as servers, and PDAs serving as clients.
Each server contains a full copy of the database management system, whereas clients contain only the query
processing capabilities. Server / client networking is provided by a standard ad-hoc network operating
with an active OLSRD routing protocol to maintain node interconnection and to dynamically handle network
topology changes. Both servers and clients with sufficient power are utilized as network nodes, allowing
network traffic to be routed through all PETRANET nodes.
Transactions can be either firm or soft. Firm transactions are associated with
a single deadline, while soft transactions are associated with two deadlines. Clients intelligently choose
which server to use based on a selection criterion which is a function of the transaction type and
network topology as reported by the OLSRD and proprietary plug ins. For firm transactions where speed is the
important element, the client will choose the server to which it can connect with a minimum number of network
hops, and if more than one server is within a minimum range of hops, it will choose the server with the
lesser workload. For soft transactions where power efficiency is desired, the client will choose the
server with the most remaining energy, regardless of network topology. Once a server is chosen by the client,
it forwards the selected transaction and deadline to that server for coordination and execution of the transaction.
The coordinating server will execute transactions based on the priority assigned to jobs by a real-time scheduler
built into the distribution system, where firm transactions with the earliest deadlines receive the highest priority.
When data is required and is not stored locally on the coordinating server, a sub-transaction shall be issued to
a server that holds the pertinent data. The servers know where to locate each table by reading from a global schema file,
which reflects data distribution across the network.
Once all sub-transactions have been issued, the coordinating server will run appropriate commit protocols.
If a transaction can be successfully prepared, it will be committed, and the results of the transaction will
be returned to the user. Otherwise, if a transaction cannot be prepared or the deadline expires before a commit
command has been issued, a rollback command shall be issued to all participating servers with prepared
sub-transactions, and the client will be alerted of the transactions failure.
back to top
Servers
Laptops with high memory, power and computing capabilities
Contains the entire DBMS
Clients
Computers with reduced memory, power and computing capabilities
Clients contain the Query Processing Module of a DBMS
back to top
Laptops (servers / clients)
1 Dell 1200 running Redhat Fedora Core 4
2 Dell Inspiron 1200s running Redhat Fedora Core 3
PDAs (clients)
2 iPaQ 5500 PocketPCs running embedded Familiar Linux v0.8.2
2 Sharp Zaurus SL-C1000s running embedded Familiar Linux v0.8.2
1 Sharp Zaurus SL-C3100 running embedded Familiar Linux v0.8.2
back to top
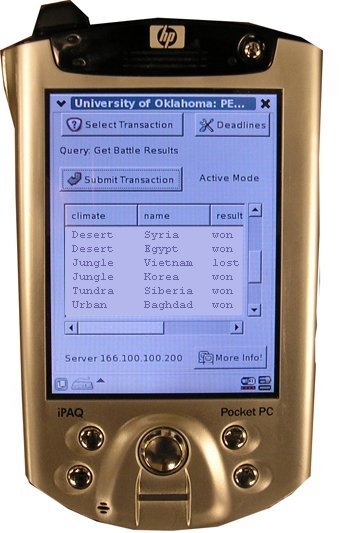
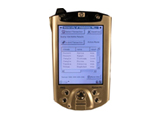
Client
The client program allows the user to choose from several pre-written transactions by clicking
the 'Select Transaction' button. In addition to choosing the transaction, a user may set both the
deadline type (Firm / Soft) and the deadline time(s) by clicking the 'Deadlines' button. After
submitting a successful transaction, the results are displayed in a grid, and the coordinating server is
placed at the very bottom of the GUI. The 'More info' button allows the user to see the list of servers the client
had available to it.
Click for larger view
back to top
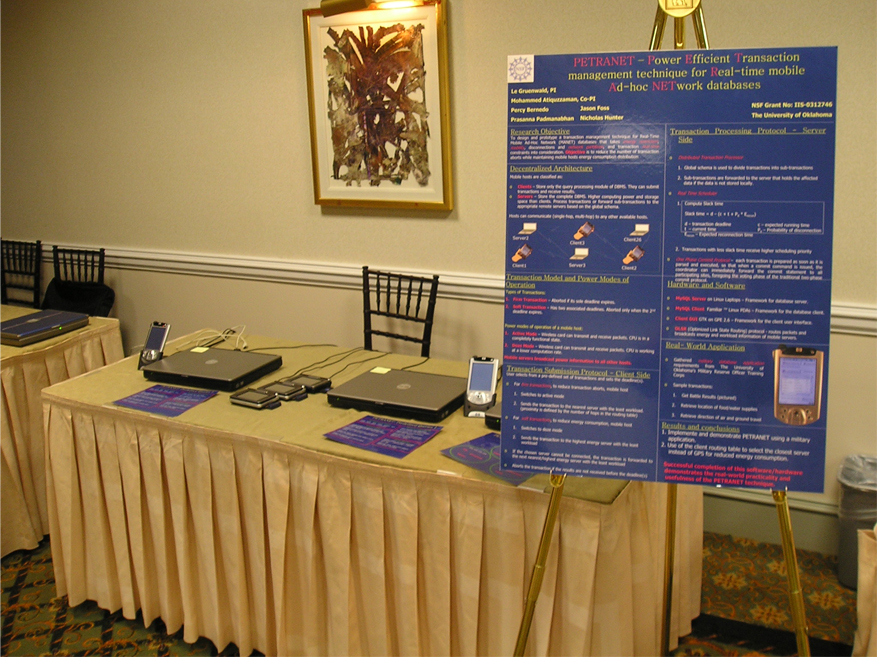
PETRANET was presented at the
2006 International Conference on Data Engineering in Atlanta, GA. The prototype
was shown as an interactive demo. Conference participants were able to use the PDAs running the PETRANET client software
which contained several pre-written military transactions. After submitting a transaction, they could observe server activity
on each of the three laptops by reading the output in a linux terminal.
Conference thumbnails
back to top
Checklist
Before downloading and installing the PETRANET software, make sure that you:
have at least one PDA to run the client on
the PDA(s) are running Familiar Linux
have 3 laptops to run the PETRANET distributed database
install Linux on both laptops
GNU Gunzip is installed on the laptops
A working ANSI C++ Compiler, (GCC 2.95 or later)
have your linux computers working with wireless cards
(if you have trouble, try ndiswrapper)
Server Setup
You must download the source package
for MYSQL 5.0.1. Once the download has finished, open a terminal
and follow the instructions off the main MYSQL site. The instructions
for MYSQL source installation can be found here.
Once you have MYSQL installed, set it up and confirm that it is working correctly. Once you have MYSQL 5.0.1
up and running correctly, you need to replace the sql folder from the MYSQL source with sql folder from the server tar below.
Download the PETRANET Server Code
You will now need to make sure MYSQL isn't running and re-make the MYSQL 5.0.1 source. NOTE: The following lines
need to be present in your Makefile inside the MYSQL directory. If these lines are not present, the MANET additions will not
be compiled and you will receive all sorts of error messages.
125 manet/manet_tools.$(OBJEXT) \
214 ./$(DEPDIR)/manet/manet_tools.Po \
578 manet/manet_tools.cc \
814 include ./$(DEPDIR)/manet/manet_tools.Po
If those lines aren't there...add them.
As of right now, you should have successfully compiled the PETRANET version of MYSQL.
From here, you need to copy the folder manet_config from the CD to the directory where
your MYSQL binaries are located. Most likely, you'll want to put it in
/usr/local/mysql/
The GlobalSchema.txt file needs to be updated to reflect your specific implementation. The basic outline looks like this:
<This computer's ip address> <user name to login to mysql> <password to login to mysql>
<server1 ip> <table 1> <table 1 preference> <table 2> <table 2 preference> EOL 0
<server2 IP> <table 1> <table 1 preference> <table 2> <table 2 preference> EOL 0
<server3 IP> <table 1> <table 1 preference> <table 2> <table 2 preference> EOL 0
<server4 IP> <table 1> <table 1 preference> <table 2> <table 2 preference> EOL 0
<server5 IP> <table 1> <table 1 preference> <table 2> <table 2 preference> EOL 0
EOF
To clarify, here is an example global schema file:
166.100.100.200 root password
166.100.100.100 soldiers 1 soldierammunition 1 enemies 1 ammunition 1 EOL 0
166.100.100.110 map 1 environment 1 logistics 1 EOL 0
166.100.100.200 platoons 1 vehicle 1 platoonsvehicle 1 EOL 0
EOF
NOTE: If all of the servers on your network don't allow access using the default name / password combination,
then you won't have connectivity to them as those WILL be used to access any server on the network.
Client Setup
In order to run the client software, you will need to download and compile it. There are several methods for
the compilation on the PDA, but we recommend cross-compiling. The official familiar site has
directions
on how to cross-compile. After determining your compilation method, make the client from the /src directory located inside the tar file.
In order to move the client executable over to the PDA, use the ad-hoc network and scp linux command. Learn more about setting up the ad-hoc
network below. After moving the client over to the PDA, you will need to copy the query files as well. First, create a subdirectory inside
the directory with the executable named "Queries". Now copy the Queries from the src/Queries (in client tar file) directory into that
new subdirectory on the PDA.
Download the PETRANET Client Source Code
After successfully setting up the queries and client program on the pda, run the program in the terminal with the following
example options:
./manet -OdefaultOptions -D/media/card -IP166.100.100.20 -IFwlan0 -SYNC166.100.100.100
Options:
-D should be the directory the client program is located in
-IP is the ip address assigned to the PDA
-IF is the wireless interface used by the client
-SYNC is the ip address of the computer that the client will sync its time with
Network Setup
The prototype runs on an ad-hoc network. Each PDA and computer should be operating on the same 'essid' and have a unique IP.
To setup the ad-hoc network, type in the following commands in the linux terminal for each computer and PDA:
iwconfig eth1 mode Ad-Hoc essid Ma
ifconfig eth1 -broadcast ipaddress
Replace the word 'ipaddress' with the ip you would like to assign to the particular computer. Some example IPs you could use are:
Servers:
166.100.100.100
166.100.100.150
166.100.100.110
|
Clients:
166.100.100.20
166.100.100.21
166.100.100.25
166.100.100.26
166.100.100.27
|
The PETRANET team used these addresses during development because they were easy to remember (100 and above for the last three digits are servers).
You may even want to label which computer is a particular address to keep track.
After setting up each computer for the ad-hoc network, download and install our OLSR plguins.
In order to install
OLSR, head to the official OLSR homepage.
After setting up regular OLSR, add our plugins to OLSR. In order to add our plugins, first enter the directory of the plugin and
run Make in that directory. You will have to do this in both plugin directories. Next, edit the olsrd.conf contained in your OLSR
directory to add both of the plugins. Look for the specific location in the .conf file for plugins, it will give you specific instructions
on what lines to add.
Download the PETRANET OLSR plugins
After OLSR is downloaded and installed for each computer, your network is properly setup to begin running the PETRANET prototype.
back to top
|